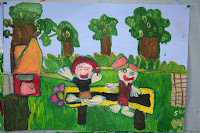
The children coloured in the different images on their painting, starting with the objects in the background. It was a real learning curve for the children to understand the different plains (background, mid-ground and foreground). To help them understand we observed out the classroom window and discussed the distance of the sky, horizon, objects further away and the ones that were closer to us.
After everything had been painted, the children painted over the objects again to add details and patterns.
Each child is able to articulate the story in their painting and can justify their use of colours and placing objects on certain parts of the composition.
The painting are now finished.
The Year 1 & 2 children in the art class are a mixed group. They were identified by teachers as having an aptitude towards art or being academically challenged. One benefit for this group is to create an opportunity for all children to experience success in a way not necessarily offered in the classroom. Also check out the blogs from last years art classes for information and good tips on teaching art to juniors.
Wednesday, March 30, 2011
Tuesday, March 8, 2011
Beginning to paint composition
The children drew their pictures onto the undercoated cardboard with chalk, copying them from their pre-drawn plan. Chalk is used because it can be easily rubbed off the undercoat if the image is not right. It is important to get the image large and bold; use lines only, no colouring in.
After the chalking had been completed the children painted over the chalk lines with thin blue paint and very thin brush (#0 or #1). This makes the image more permanent when applying the top coats of paint. I use blue and not black because I have found black paint permeates through the other colours after they have been applied. I was delighted to see the children enlarged their images to fit the A2 size cardboard. Certainly modeling and talking through the process helped them understand what was required.
After the chalking had been completed the children painted over the chalk lines with thin blue paint and very thin brush (#0 or #1). This makes the image more permanent when applying the top coats of paint. I use blue and not black because I have found black paint permeates through the other colours after they have been applied. I was delighted to see the children enlarged their images to fit the A2 size cardboard. Certainly modeling and talking through the process helped them understand what was required.
Tuesday, March 1, 2011
Planning our paintings
We looked at a painting done by Glenda Randerson (Auckland) to discuss the story she was telling. Once the children understood what I was asking them, (by telling a story about another painting) they could tell the story of Glenda’s daughter (subject in the painting) and also identified the images that gave them the clues.
The next step was to get the children talking about what they liked to do and where.
I gave them A2 newsprint and we folded into quarters. On one section they drew themselves doing something they liked, on another, two special things and finally the scene they wanted their story to take place.Following this process they cut the paper into the quarters, keeping the scene they cut the other images out. They placed them onto the scene to find the best position and glued them.This became the planning for the painting. I realised the planning sketch was A4 size and that I was expecting the children to enlarge their image onto A2 size.
Alternative for next time, I would get them to draw on the full size first.
To overcome the problem I got the children to redraw their sketch onto A2 newsprint. I was pleasantly surprised to see they handled this well. Proceeding the redrawing they started to colour the images. The bonus of having the redraw was they become more familiar with the images and could make changes and improvements.
We painted the undercoat on the cardboard.
Subscribe to:
Comments (Atom)


