After reading Betty Edwards book Drawing on the Right Side of the Brain
(ISBN 0-87477-419-5) I have decided to teach the children to draw based on her drawing techniques. She bases her ideas on a multitude of research done on the functions of the brain.
A very brief explanation:
The left brain is verbal and rational, it communicates thoughts through numbers, letters and words.
The right brain is non-verbal and intuitive, it thinks in pictures and patterns.
It is commonly known that not everyone thinks or learns the same way. After reading some research on the brain, I am sure promoting the use of the right brain will assist children to learn.
Our education system is designed to use predominately left brain thinking and encouraging children to use their right brain for drawing will be a challenge and I am extremely interested to witness the results.
Sunday, August 21, 2011


Wednesday, March 30, 2011
Painting Finished
The children coloured in the different images on their painting, starting with the objects in the background. It was a real learning curve for the children to understand the different plains (background, mid-ground and foreground). To help them understand we observed out the classroom window and discussed the distance of the sky, horizon, objects further away and the ones that were closer to us. 

After everything had been painted, the children painted over the objects again to add details and patterns.
Each child is able to articulate the story in their painting and can justify their use of colours and placing objects on certain parts of the composition.
The painting are now finished.

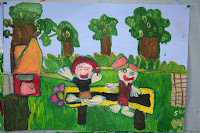


After everything had been painted, the children painted over the objects again to add details and patterns.
Each child is able to articulate the story in their painting and can justify their use of colours and placing objects on certain parts of the composition.
The painting are now finished.


Tuesday, March 8, 2011
Beginning to paint composition
The children drew their pictures onto the undercoated cardboard with chalk, copying them from their pre-drawn plan. Chalk is used because it can be easily rubbed off the undercoat if the image is not right. It is important to get the image large and bold; use lines only, no colouring in.


After the chalking had been completed the children painted over the chalk lines with thin blue paint and very thin brush (#0 or #1). This makes the image more permanent when applying the top coats of paint. I use blue and not black because I have found black paint permeates through the other colours after they have been applied. I was delighted to see the children enlarged their images to fit the A2 size cardboard. Certainly modeling and talking through the process helped them understand what was required.


After the chalking had been completed the children painted over the chalk lines with thin blue paint and very thin brush (#0 or #1). This makes the image more permanent when applying the top coats of paint. I use blue and not black because I have found black paint permeates through the other colours after they have been applied. I was delighted to see the children enlarged their images to fit the A2 size cardboard. Certainly modeling and talking through the process helped them understand what was required.


Tuesday, March 1, 2011
Planning our paintings
We looked at a painting done by Glenda Randerson (Auckland) to discuss the story she was telling. Once the children understood what I was asking them, (by telling a story about another painting) they could tell the story of Glenda’s daughter (subject in the painting) and also identified the images that gave them the clues.
The next step was to get the children talking about what they liked to do and where.
I gave them A2 newsprint and we folded into quarters. On one section they drew themselves doing something they liked, on another, two special things and finally the scene they wanted their story to take place.
 Following this process they cut the paper into the quarters, keeping the scene they cut the other images out. They placed them onto the scene to find the best position and glued them.
 This became the planning for the painting. I realised the planning sketch was A4 size and that I was expecting the children to enlarge their image onto A2 size.
Alternative for next time, I would get them to draw on the full size first.
To overcome the problem I got the children to redraw their sketch onto A2 newsprint. I was pleasantly surprised to see they handled this well. Proceeding the redrawing they started to colour the images. The bonus of having the redraw was they become more familiar with the images and could make changes and improvements.
We painted the undercoat on the cardboard.
The next step was to get the children talking about what they liked to do and where.
I gave them A2 newsprint and we folded into quarters. On one section they drew themselves doing something they liked, on another, two special things and finally the scene they wanted their story to take place.


Alternative for next time, I would get them to draw on the full size first.
To overcome the problem I got the children to redraw their sketch onto A2 newsprint. I was pleasantly surprised to see they handled this well. Proceeding the redrawing they started to colour the images. The bonus of having the redraw was they become more familiar with the images and could make changes and improvements.
We painted the undercoat on the cardboard.

Friday, February 25, 2011
Week 3
Have started observational sketching. Getting the children to really look at the shapes and angles of the object they are sketching. To start with the objects were drawn after a glance or traced around. The quality of drawing improved after demonstrating how to look at one point on the object and getting the eye to move around the perimeter. Observational sketching will become a regular part of the art day. I also showed the children how to draw a person using the formula of 7 parts. The had to use a ruler to measure 7 even parts, then rule straight lines across the page, a lesson in itself. This was a step by step process to draw a person. After they had followed the instructions the children were expected to draw their own person. It was very satisfying to see the people they drew were in much closer proportion then prior drawings.
 Colour theory was also a big part of the learning. We discussed the primary colours (yellow, blue and red). I gave them a large paper, yellow, red and blue paint and 3 paint brushes. We painted the 3 colours separately (so the colours were clean) on the paper then let them mix the colours. It was a delight to hear the conversation and surprised expression as they made green, purple and orange. For the rest of the session they children covered the paper with different blended colours.


 It became obvious the children were taking risks with the colour blending and really thinking about the paints they were applying to the paper. They were looking at each others painting and trying to blend the colours that appealed.


Friday, February 18, 2011
Initial Lesson- study Henri Matisse and telling stories through pictures
We looked at photography and what makes a good picture. We identified the line of thirds and talked about colours. Some of the children had never used a camera before and were very keen to take photos. What is special was the theme for the day and the children had to list or draw things that are special to them.To get some images to help the children plan a composition, they went around the school taking photos of special places and people.
We then discussed the art Henri Matisse and looked at some of his paintings. We made up stories about the people/person, using the objects and setting in the painting.
The purpose of this is to develop an understanding that paintings/pictures tell stories.
Lunchtime - the time went so quickly ... work in progress...
Week 2:
We learned how the draw faces. The children did an initial drawing of a face. Working through a simple process of demonstrating and the children following we worked the dimensions of the face. Instead of using pencils, I gave the children yellow and red paint and a brush. They had to draw a face and fill in the shin and hair. They were very proud of the results. By using the paint the children could not make the face too small and the line could not be rubbed out. They were careful to start but soon became more confident with making the lines and shapes.


We then discussed the art Henri Matisse and looked at some of his paintings. We made up stories about the people/person, using the objects and setting in the painting.
The purpose of this is to develop an understanding that paintings/pictures tell stories.
Lunchtime - the time went so quickly ... work in progress...
Week 2:
We learned how the draw faces. The children did an initial drawing of a face. Working through a simple process of demonstrating and the children following we worked the dimensions of the face. Instead of using pencils, I gave the children yellow and red paint and a brush. They had to draw a face and fill in the shin and hair. They were very proud of the results. By using the paint the children could not make the face too small and the line could not be rubbed out. They were careful to start but soon became more confident with making the lines and shapes.


Tuesday, April 6, 2010
Ripping the Prints


The children had done several prints different colours page. When these were dry they chose the best print as a base, then they ripped pieces off the other prints and glues then onto the base print. They had to match the features on the prints so the integrity of the print was not changed.
The compositions that worked the best were the ones using contrasting colours.
Glue sticks were sufficient to stick down the paper, were easy for children to handle, no caused no mess.
Tip to watch out for: make sure the children do not try and cover the whole base print with the ripped prints. (Some tried to do this and it looked very messy).
Watching the concentration on the children’s faces as they matched up the patterns and lines, then the delight as they stepped back and looked at their creation was delightful.
We got a lot of artwork out of the simple PVA and shellac templates (black and white prints, plain colour prints on coloured paper, plain colour prints on white paper, multi coloured prints on white paper and the ripped print creations). The templates have now been mounted and become a work of art too.
For further reference we could have printed on tissue paper and ripped and scrunched that onto a base print for a different effect.
Key competency:
Thinking: the children became thinkers, they got a picture in their head of what they wanted their ripped compositions to be, and they problem solved and truly created their artwork without interference or suggestions from me.
They have become Artists.
Subscribe to:
Posts (Atom)